

This post may contain affiliate links.
My daughter (aka Squid) helped me design this sweater. She picked the length and the fit. If you’d like to make it longer simply add more rows to the bottom. If you’d like longer sleeves you can add more length there too 😉
Note: This sweater also fits my 18 month old as a long sleeved cardigan.
Scroll down to enjoy this pattern for free or you can purchase a PDF to print.

Click HERE to add this pattern to your Ravelry queue
Size
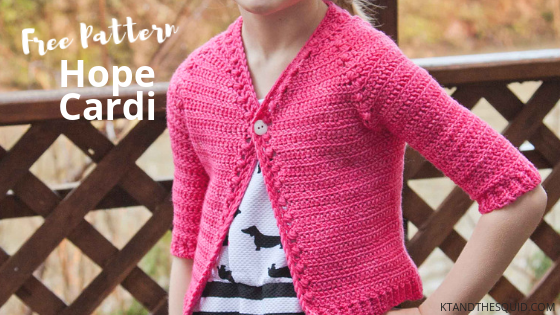
Girls size 4/6
Chest: 23-25”
Finished chest: 25”
*Garment modeled on a 25” chest. I only have the one size and will not be doing more but if you’d like to tackle adjusting the sizing go for it! 🙂
Yarn
Plucky Sweater by The Plucky Knitter (90% merino/10% nylon; 270 yd/247m; DK/8ply/light worsted/3 weight)
2 hanks of Petticoat
Hook
Furls Odyssey H/5mm hook (or hook to obtain gauge)
Notions
1-6 size 4 sew on snaps or 5/8” buttons
Yarn needle
Gauge (more info HERE)
17 herr hdc worked in the FLO by 10 rows = 4” square (blocked)
Notes
Please read all instructions before beginning.
This sweater is worked from top down in one piece.
When instructed to join, join with a slip stitch to the first stitch of the round.
The number at the end of each row/round is the stitch count

Abbreviations
Ch = chain
St = stitch
Fsc = foundation single crochet
Herr hdc = herringbone half double crochet
CL = Cluster
Sc = single crochet
Rs = right side
Ws = wrong side
FLO = front loop only
BLO = Back loop only
Special Stitches
Foundation Single Crochet (Fsc): Foundation Single Crochet (Fsc): Ch 2, insert hook into the 2nd ch from hook, yarn over, pull up a loop (2 loops on hook), yarn over, pull through 1 loop on hook (this makes the ch), yarn over, pull through 2 loops on hook (completes the sc).
Next Fsc: Insert hook under the 2 loops of the ch of the last st and pull up a loop, yarn over, pull through 1 loop, yarn over pull through 2 loops. Video HERE.
Herringbone Half Double Crochet (herr hdc): Yarn over, insert hook into stitch indicated, yarn over, pull through stitch AND first loop on hook, yarn over, pull through 2 remaining loops on hook.
Cluster (CL): (Yarn over, insert hook into stitch indicated, pull up a loop) 3 times, yarn over, pull through all loops on hook.
Instructions
Yoke
Shaping of Neck and Raglan
Row 1: Fsc 42.
Place a SM on st # 4, 10, 33 and 39.
Row 2: Ch 1 (does NOT count as a st from here on), turn, working in the FLO, 2 herr hdc in the 1st st, *herr hdc in each st until 1 st remains before the SM, 2 Herr hdc in the next st, CL in the marked st and move SM to the st just made, 2 herr hdc in the next st; repeat from * 3 more times, herr hdc in each st unit 1 st remains, 2 herr hdc in the last st. 52
Repeat row 2 until you have 9 rows. 122
You are adding 10 sts each row.

Shaping of Raglan only
Row 1: Ch 1, turn, working in the FLO, *herr hdc in each st until 1 st remains before the SM, 2 Herr hdc in the next st, CL in the marked st and move SM to the st just made, 2 herr hdc in the next st; repeat from * 3 more times, herr hdc in each remaining st. 130
Repeat row 1, 3 more times. 154
Body
Divide for Underarms
Row 1 (dividing row): Ch 1, turn, working in the FLO, *herr hdc in each st before the SM, herr hdc in the marked st and remove SM, ch 5, herr hdc in the next marked st (skip all sts in between the marked sts) and remove SM; repeat from * 1 more time, herr hdc in each remaining st. 96 plus 2 ch spaces.
Row 2: Ch 1, turn, *herr hdc in each st across. 106
Repeat row 2, 18 more times (20 total rows).
Do NOT Fasten off
Trim
Front and Neck
Row 1 (ws): Ch 1, working in the FLO, (herr hdc in next, CL in next) evenly up the front, around the neck and down the other front.
Tip: work one st per row when working on the fronts of the cardigan.
Row 2 (rs): Ch 1, turn, working in the FLO, herr hdc in each st across.
Do NOT fasten off.
Bottom Ribbing
Row 1: Ch 5, sc the 2nd ch from hook, sc in the next 3 chs,
ss in the end of row 1 of the front trim and the 1st st of the bottom of the cardigan. (4)
Row 2: Working in the BLO, skip the 1st 2 ss, sc in the next 4 sts. (4)
Row 3: Turn, working in the BLO, sc in the 1st 4 sts, ss in the next 2 sts of the bottom of the cardigan. (4)
Repeat rows 2 and 3 across the bottom of the cardigan until you reach the other side of the front trim ending with row 2.
Next Row: Turn, working in the BLO sc in the 1st 4 sts, ss in the ends of the 2 rows of the front trim.
Repeat row 2. (4)
Finishing Row (rs): Ch 1, turn, evenly sc in each st up the front trim, around the neck and down the other side of the front trim.
Fasten off.

Sleeves
With RIGHT side facing join to any st of the underarm.
Round 1: Ch 1, turn, working in the FLO herr hdc in each st around, join with a ss to the 1st st. 34
Round 2: Ch 1, turn, working in the FLO herr hdc in each st around, join with a ss to the 1st st. 34
Repeat round 2 adding a decrease row (instructions below) every 2 rounds alternating between decrease round 1 and 2 until you have 18 total rounds.
Tip: if you do not alternate between the 2 decrease rounds the seam down the sleeve will slant to one side.
Decrease Round 1: Ch 1, turn, working in the FLO herr hdc in each st until 1 st remains, skip the last st, join with a ss to the 1st st.
Decrease Round 2: Ch 1, turn, Skip the 1st st, working in the FLO herr hdc in each remaining st join with a ss to the 1st st.
You will end with 25 sts.
Sleeve Trim
Row 1: Ch 5, sc the 2nd ch from hook, sc in the next 3 chs,
ss in the end of row 1 of the front trim and the 1st st of the bottom of the sleeve. 4
Row 2: Working in the BLO skip the 1st 2 ss, sc in the next 4 sts. 4
Row 3: Turn, working in the BLO sc in the 1st 4 sts, ss in the next 2 sts of the bottom of the sleeve. 4
Repeat rows 2 and 3 around the entire sleeve opening, join the first row to the last row working in the BLO to keep the ribbing consistent.
Fasten off, repeat on the other arm opening.
Finishing
Weave in all ends and block.
Sew snaps (or buttons) onto trim spacing them about 2” apart. I only used one in the sample and placed it at the beginning of the shaping of the raglan only.
If using buttons they will fit through the space between the CL and Herr hdc of the front trim.
